
Welcoming a baby is a joyous occasion, and what better way to celebrate than with adorable, bite-sized treats? Baby shower cake pops are not just delicious but also add a decorative touch to the dessert table. Whether you’re hosting a gender reveal party, a themed baby shower, or simply looking for an easy-to-serve treat, cake pops are the perfect pick.
In this guide, we’ll take you through everything you need to know about making baby shower cake pops—from choosing flavors to decorating them beautifully. You’ll also get expert tips on presentation, storage, and FAQs. So, whether you’re a baking pro or a first-timer, this article will help you create stunning and tasty cake pops for an unforgettable baby shower.
Let’s get started!
Introduction to Baby Shower Cake Pops
The Significance of Cake Pops in Baby Showers
When planning a baby shower, desserts play a huge role in setting the mood. While cakes and cupcakes are traditional choices, cake pops offer a unique, fun, and mess-free alternative. Their small size makes them perfect for guests to enjoy without the need for plates or utensils. Plus, they can be customized in colors, themes, and flavors to match the baby shower décor.
Beyond their convenience, cake pops add a personal touch to the celebration. Whether designed with baby-related decorations like rattles, bibs, or baby footprints, or simply covered in pastel-colored sprinkles, they instantly make any dessert table stand out.
Why Choose Cake Pops Over Traditional Cakes?
If you’re torn between a large cake and individual treats, here’s why baby shower cake pops might be the better option:
- Easy to Serve – No need to slice or distribute; guests can grab and enjoy instantly.
- Mess-Free – No sticky fingers, no crumbles—just perfect bite-sized portions.
- Endless Customization – You can design them to match any theme, whether it’s gender-neutral, pink and blue, or animal-themed.
- Great for Party Favors – Wrap them up in cute packaging, and they double as take-home gifts for guests.
With these benefits, it’s no wonder cake pops are becoming a baby shower must-have! Ready to learn more? In the next section, we’ll dive into the basics of cake pops and why they are so popular.
Understanding Cake Pops
What Are Cake Pops?
Cake pops are bite-sized dessert treats made by crumbling cake, mixing it with frosting, shaping it into small balls, and coating them with chocolate or candy melts. These delicious treats are served on a stick, making them easy to hold and eat—just like lollipops!
For baby showers, cake pops offer a stylish and convenient way to serve dessert. Unlike cupcakes or large cakes, they don’t require plates, forks, or napkins, which makes them a great choice for hassle-free entertaining.
History and Popularity of Cake Pops
Though cake pops seem like a modern trend, their concept dates back to creative bakers finding ways to repurpose leftover cake. However, they became a worldwide sensation in the early 2000s, thanks to innovative designs and social media. Today, baby shower cake pops are among the most sought-after desserts for themed parties, loved for their versatility and visual appeal.
Why have they become so popular?
- Perfect for Any Occasion – Whether for a gender reveal, a classic baby shower, or a themed event, cake pops fit every celebration.
- Customizable Designs – From baby footprints to pacifier shapes, there are endless decoration options.
- Easy to Eat and Serve – Unlike cake slices, there’s no need for utensils or extra clean-up.
Now that you understand what makes cake pops special, let’s dive into planning the perfect batch for a baby shower!
Planning Your Baby Shower Cake Pops
Choosing the Right Flavors
The first step to making baby shower cake pops unforgettable is picking the right flavors. You want something tasty yet crowd-pleasing. Here are some popular options:
- Classic Vanilla – Light, sweet, and pairs well with any frosting.
- Rich Chocolate – A favorite for chocolate lovers, offering a decadent taste.
- Red Velvet – A touch of cocoa with a mild tang, often paired with cream cheese frosting.
- Lemon or Strawberry – Bright and refreshing flavors, perfect for a summer baby shower.
For a unique touch, consider using different flavors to match the baby shower theme. For instance, pink strawberry cake for a girl, or blue velvet cake for a boy!
Selecting Appropriate Colors and Themes
The beauty of cake pops is how easily they can be customized. Start by selecting colors that match the baby shower theme:
- Traditional Blue or Pink – Great for gender-specific celebrations.
- Pastel Colors – Soft shades like mint, lavender, and peach add a delicate touch.
- Gold and White – A chic and elegant choice for modern baby showers.
- Neutral Tones – Beige, gray, and soft greens work well for gender-neutral themes.
Beyond colors, consider fun themes such as baby animals, teddy bears, or celestial designs. You can even add edible letters spelling “Baby” or “Oh Baby” on your cake pops!
Estimating Quantities Based on Guest Count
It’s easy to underestimate how many baby shower cake pops you’ll need. A good rule of thumb is to prepare:
- 2-3 cake pops per guest – If they’re the main dessert.
- 1-2 cake pops per guest – If served alongside other sweets.
If you’re offering them as party favors, consider individually wrapping them with ribbons and tags for an extra special touch.
With your flavors, colors, and quantities planned, it’s time to get baking! In the next section, we’ll cover the step-by-step process to make perfect baby shower cake pops.
How to Make Baby Shower Cake Pops
Ingredients Needed
To create delightful baby shower cake pops, gather the following ingredients:
- Cake Mix: Choose your preferred flavor—vanilla, chocolate, or red velvet.
- Frosting: Cream cheese or buttercream works well.
- Candy Melts or Chocolate: For coating; select colors that match your baby shower theme.
- Lollipop Sticks: Easily found at craft stores or online.
- Sprinkles or Edible Decorations: To add a festive touch.
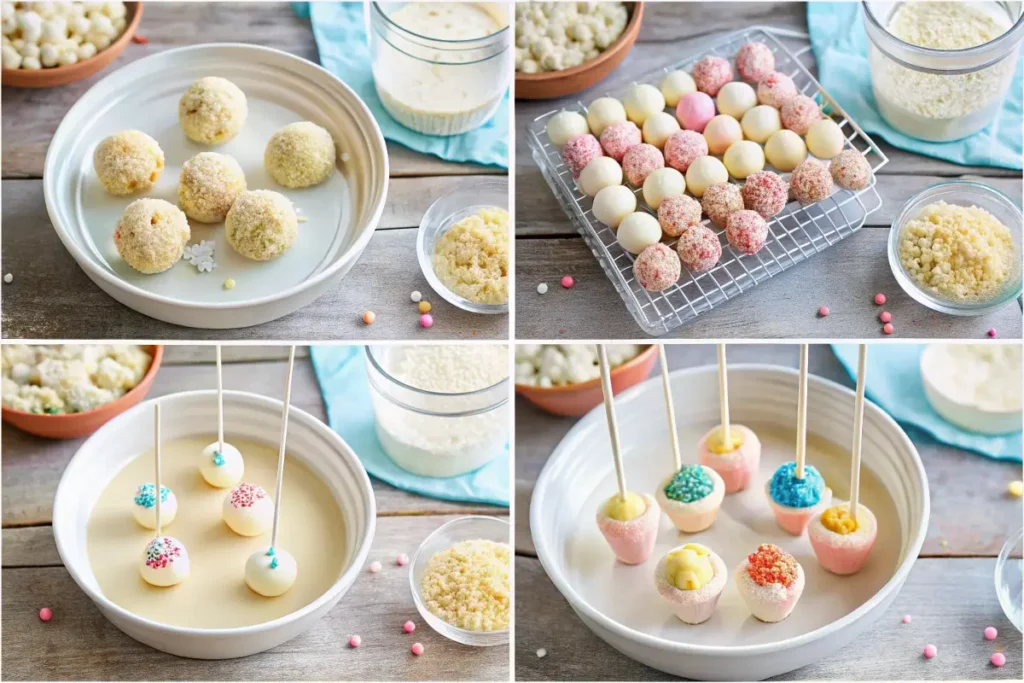
Step-by-Step Baking Instructions
- Bake the Cake: Prepare the cake mix as per the package instructions. Once baked, allow it to cool completely.
- Crumble the Cake: Using your hands, break the cooled cake into fine crumbs in a large bowl.
- Mix in Frosting: Add a small amount of frosting to the cake crumbs. Start with a few tablespoons and mix thoroughly. The mixture should be moist enough to hold its shape but not overly sticky.
- Shape the Cake Balls: Scoop out portions of the mixture and roll them into balls approximately 1 inch in diameter. Place them on a baking sheet lined with parchment paper.
- Insert the Sticks: Melt a small amount of your candy melts or chocolate. Dip the tip of each lollipop stick into the melted coating and insert it halfway into each cake ball. This helps secure the stick in place.
- Chill the Cake Pops: Place the tray of cake pops in the refrigerator for about 15-20 minutes, allowing them to firm up.
- Coat the Cake Pops: Melt the remaining candy melts or chocolate in a deep bowl. Dip each cake pop into the melted coating, ensuring it is fully covered. Gently tap off any excess and immediately add sprinkles or decorations before the coating sets.
- Let Them Set: Place the decorated cake pops upright in a styrofoam block or a stand until the coating hardens completely.
Shaping and Inserting Sticks
Achieving the perfect shape for your baby shower cake pops adds to their appeal:
- Uniform Size: Use a cookie scoop to ensure each cake ball is the same size, promoting even coating and presentation.
- Securing the Stick: Dipping the lollipop stick into melted coating before insertion acts as adhesive, preventing the cake ball from sliding off during dipping.
Coating and Decorating Techniques
The coating and decoration process allows for creativity:
- Smooth Coating: Ensure the melted candy or chocolate is smooth and fluid. If it’s too thick, add a small amount of vegetable oil or paramount crystals to achieve the desired consistency.
- Color Coordination: Match the coating color to your baby shower theme. For instance, use pastel pink or blue for traditional themes, or opt for neutral colors like mint or lavender for a modern touch.
- Adding Decorations: While the coating is still wet, sprinkle edible glitter, confetti, or place small fondant shapes on the cake pops. This not only enhances their appearance but also ties them into the overall theme of your event.
By following these steps, you’ll create delightful and visually appealing baby shower cake pops that are sure to impress your guests.
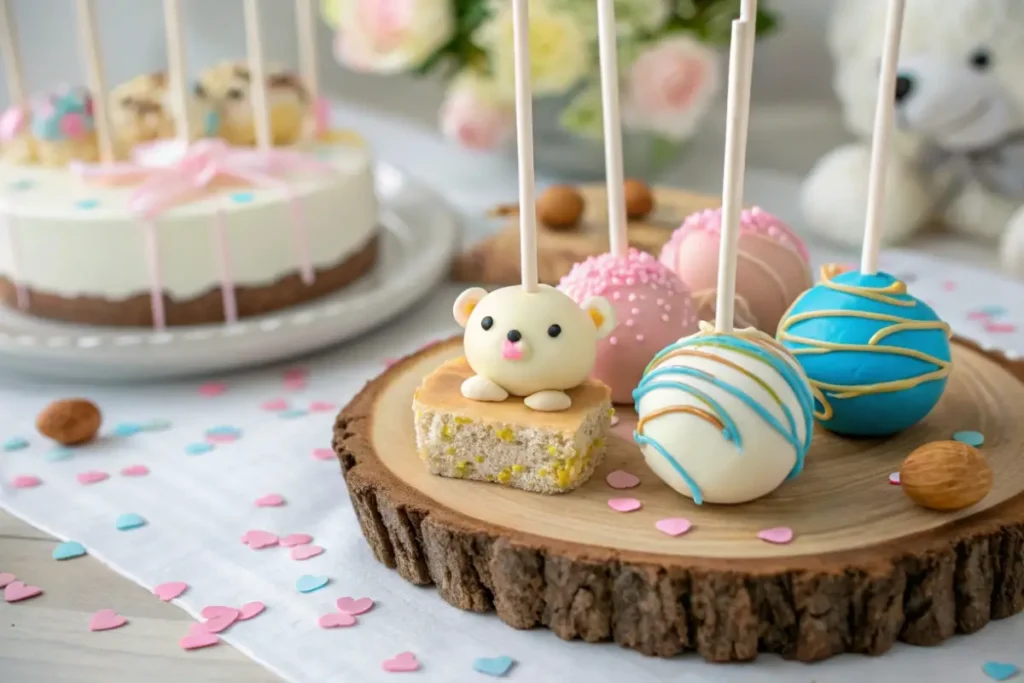
Creative Decoration Ideas for Baby Shower Cake Pops
Gender Reveal Cake Pops
Gender reveal cake pops add an element of surprise to your baby shower. Here’s how to make them:
- Color the Filling: After mixing the cake crumbs with frosting, divide the mixture. Add pink or blue food coloring to indicate the baby’s gender.
- Coat with Neutral Colors: Dip the cake pops in white or pastel-colored coating to keep the gender a secret until the first bite.
- Reveal the Surprise: When guests bite into the cake pops, they’ll discover the colored center, revealing the baby’s gender in a fun and tasty way.
For a visual guide, you might find this DIY baby rattle cake pops tutorial inspiring.
Themed Designs: Animals, Baby Accessories, etc.
Incorporate the baby shower theme into your cake pop designs:
- Baby Animals: Create cake pops shaped like cute animals—think baby elephants, ducks, or teddy bears. Use colored coatings and edible markers to add details like eyes and noses.
- Baby Accessories: Design cake pops to resemble baby bottles, pacifiers, or rattles. Molding the cake mixture into specific shapes before dipping can achieve these designs.
- Seasonal Themes: Align your cake pops with the season. For example, use pastel flowers for spring or snowflakes for winter-themed showers.
Incorporating Personalized Elements
Adding personal touches makes your baby shower cake pops unique:
- Monograms: Use edible ink pens or small fondant letters to inscribe the baby’s initials on each cake pop.
- Custom Colors: Match the cake pop colors to the nursery or party décor for a cohesive look.
- Edible Glitter: Add a touch of sparkle with edible glitter, making your cake pops stand out. Ensure the glitter is FDA-approved for consumption.
By embracing these creative decoration ideas, your baby shower cake pops will not only taste delightful but also serve as a charming centerpiece, leaving
Displaying and Serving Your Cake Pops
Presentation Tips
A great way to make your baby shower cake pops look even more appealing is through creative presentation. Instead of just laying them flat on a tray, try these ideas:
- Cake Pop Stands – Use a foam block covered in decorative wrapping paper or a tiered cake pop stand to hold them upright. This creates a beautiful display.
- Mason Jars or Glass Vases – Fill them with colored candies or decorative beads and insert the cake pops for a fun and stylish look.
- Mini Bouquets – Arrange cake pops like flowers in a small basket or decorative pot, making them an eye-catching centerpiece.
A well-presented dessert table not only looks beautiful but also makes guests excited to try your treats.
Incorporating Cake Pops into Dessert Tables
To create a balanced dessert table, mix and match your baby shower cake pops with other sweet treats. Consider pairing them with:
- Matching Cupcakes – Decorate with the same frosting or colors.
- Mini Cookies – Use the same baby shower theme to tie everything together.
- Personalized Name Tags – Add small labels to your cake pops with cute names like “Baby Bites” or “Sweet Little Kicks.”
By placing your cake pops among other desserts, you’ll create a stunning and cohesive dessert table.
Packaging Ideas for Guests
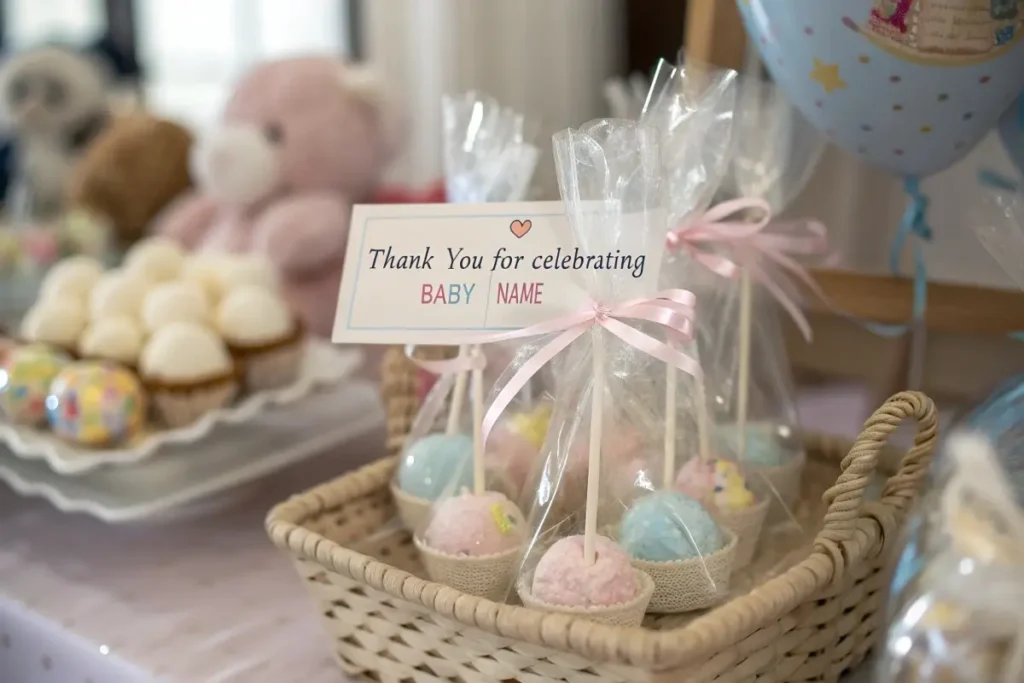
If you want to give your cake pops as party favors, try these creative packaging ideas:
- Cellophane Bags with Ribbons – Wrap each cake pop individually and tie it with a pastel-colored ribbon.
- Small Gift Boxes – Arrange a few cake pops inside a decorated box for an elegant touch.
- Personalized Stickers – Add labels with the baby’s name or the shower date for a custom look.
With the right display and packaging, your baby shower cake pops will not only be delicious but also serve as a beautiful part of the celebration.
Frequently Asked Questions
You can make baby shower cake pops up to five days in advance if stored properly. Keep them in an airtight container in the refrigerator to maintain freshness. If you need to prepare them earlier, you can freeze the undipped cake balls for up to a month. Just thaw them in the fridge before dipping them in chocolate or candy melts to avoid cracks.
The best cake for baby shower cake pops depends on your flavor preference, but some of the most popular choices include:
Vanilla – Light, sweet, and pairs well with any frosting or coating.
Chocolate – Rich and indulgent, a crowd favorite.
Red Velvet – A beautiful color with a mild cocoa flavor, perfect for an elegant touch.
Lemon or Strawberry – Fresh, fruity options that are great for spring or summer baby showers.
Choosing a flavor that matches your theme and guests’ preferences will make your cake pops even more special!
Yes! After shaping the cake balls and inserting the sticks, chill them in the fridge for 15-20 minutes or freeze them for about 10 minutes before dipping. This helps them firm up and stay on the stick. However, avoid over-freezing, as extremely cold cake pops can cause the coating to crack when dipped in warm chocolate
The key to perfect baby shower cake pops lies in a few simple tricks:
Don’t add too much frosting – The mixture should be moist but not too soft.
Chill before dipping – Slightly firm cake balls hold their shape better.
Use melted candy or chocolate correctly – Ensure it’s warm but not too hot, as extreme temperature differences can cause cracking.
Tap off excess coating gently – After dipping, lightly tap the stick on the bowl’s edge to remove excess chocolate without making the cake pop fall apart.
By following these tips, you’ll create smooth, delicious, and beautifully coated baby shower cake pops every time!
What is the trick to cake pops?
The key to perfect baby shower cake pops lies in a few simple tricks:
- Don’t add too much frosting – The mixture should be moist but not too soft.
- Chill before dipping – Slightly firm cake balls hold their shape better.
- Use melted candy or chocolate correctly – Ensure it’s warm but not too hot, as extreme temperature differences can cause cracking.
- Tap off excess coating gently – After dipping, lightly tap the stick on the bowl’s edge to remove excess chocolate without making the cake pop fall apart.
By following these tips, you’ll create smooth, delicious, and beautifully coated baby shower cake pops every time! 😊
Conclusion
Creating baby shower cake pops is a fun and rewarding way to add a special touch to any celebration. These adorable, bite-sized treats are not only delicious but also easy to serve and customize. From choosing flavors and decorations to displaying them beautifully, cake pops make a perfect addition to any baby shower dessert table.
By following this guide, you’ll be able to make stunning and tasty cake pops that will impress your guests. So, gather your ingredients, unleash your creativity, and start baking! Your beautifully decorated baby shower cake pops are sure to be a hit at the party!